February class recap

Okay, I didn’t actually get to hold my January Paper Pumpkin workshop due to Seattle Snow-Mageddon 2019. (I know people in other parts of the country think we’re a bunch of crybabies over the eight or so inches of snow we got this last weekend, but please before you judge, try driving around a hilly city that has a minimum number of snowplows and a bunch of people only who know how to drive in the rain.) Our storm had a positive effect on my paper-crafting though. I had plenty of extra time to sit down and do some creating and blog posting.

As per usual, I’ll give a quick rundown of the January Paper Pumpkin kit contents. Since Valentines Day occurs in February, the kit contained the supplies to make these treat boxes.

01.19_PP_YOUTUBE


The stamp set includes an image of diagonal lines, a trail of tiny hearts, one large heart, one small bird, one big bird, and a chameleon with an insect on his tail. The sentiments are: You’re one chameleon; For You, My friend; To: From:; love you; You’re so fly.’ Be Mine; Happy Valentine’s Day; and, Be my Valentine.

Be Mine Valentine-Edited

The treat box idea is cute, but my daughters aren’t at an age where you bring cards/treats to all of your classmates, so I have limited use for them. However, the stamp set included with this month’s kit is very versatile.

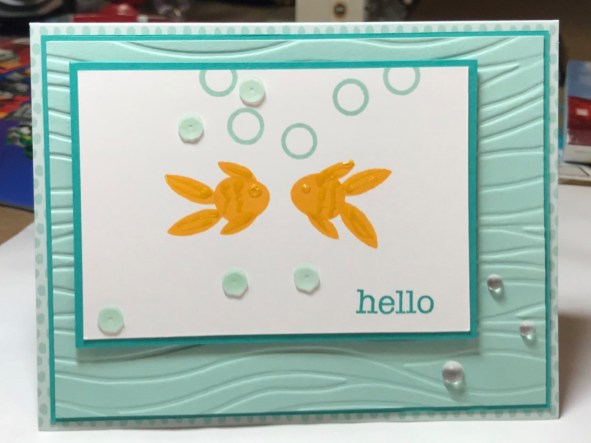
Here’s a notecard I made. Other than the stamp set, I didn’t use any supplies from the kit.

Chameleon stack

Card Recipe:
Paper: Whisper White, So Saffron, Blackberry Bliss, Lemon-Lime Twist, metallic black, Tropical Escape DSP
Ink: Memento Black
Markers: So Saffron, Blackberry Bliss, Lemon-Lime Twist
Embellishments: Striped metallic ribbon, Dimensionals

For this card, my only addition to the kit supplies was a sheet of cardstock for the base. I cut up the pillow boxes to use as design elements. The great thing about the treat boxes is that they’re reversible, so I only “sacrificed” one pillow box to make the card.

Chameleon

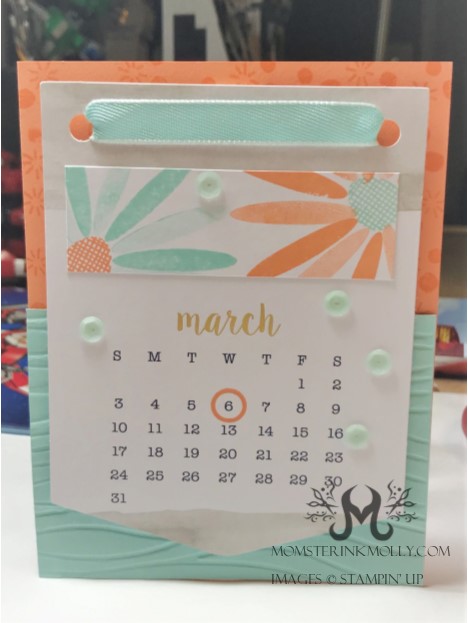
Finally, my last alternative for the January kit is a double slider card. A tutorial for making this cute double-slider card is in the works.


Snip ‘n Stamp

20190117_221305642_iosBefore the dawn of die-cut rubber and photopolymer stamps, we Stampin’ Up customers had to cut out our own stamps. They arrived on a sheet of rubber attached to foam mount. We used special scissors with tiny points and giant handles to snip out our stamps and then mount them to wood blocks. People sometimes altered the stamps–cutting a sentiment from one stamp and mounting it on a spare wood block. Luckily, we don’t have to snip our own stamps anymore, which is why I forgot about manually trimming until a few people on the PAPER PUMPKIN FANCLUB Facebook page brought up how they used an Xacto-knife to separate some of the shapes from the December kit, Day by Day, to make the stamp set more versatile. This was a fabulous idea. While some people divided their stamps more thoroughly, I only separated this one:

inked12.18_pp_stampartwork_li

The picture looks like a badly drawn emoji, but I ended up with three sizes of ovals. I used to make some of my favorite cards.

My first card is inspired by a card by Rachael White (a woman I have never met) which she posted on Facebook. (Seriously, if you want to see oodles of creative alternate Paper Pumpkin projects, visit the PAPER PUMPKIN FAN CLUB page on Facebook.) My card is basically the same as hers, except I foam-rolled the doily with Pool Party ink and added a bunny brad. (I have an overabundance of shaped-brads from the days when they were trendy).


dec18card3


Next, I made this birthday card using one of the calendar pages from the kit. Since I rarely look at a calendar that isn’t on my phone or computer, the prescribed calendar project wasn’t practical for me. I saw multiple versions of this card out there, using the circle stamp to indicate the birthdate of the recipient. Again, I used the three ovals I snipped apart from the stamp set to create the flowers at the top of the calendar page. I created the background pattern at the top of the card base by stamping Grapefruit Grove ink on Grapefruit Grove paper. I ran the bottom piece through the Seaside Textured Impressions embossing folder.

dec18card1

Finally, I had a little fun of my own and made these two little fish. I used gold Irresistible Pico Embellisher (which isn’t a Stampin’ Up product, but is still really cool to have) to give the fish some texture and dimension. I think he’s pretty cute.

dec18card2

Card recipes

Bunny
Stamps and ribbon from December 2018 Paper Pumpkin kit
Paper: Thick Whisper White, Early Espresso, Wood Textures DSP
Ink: Grapefruit Grove, Granny Apple Green, Pool Party
Other accessories: Bunny brad, Pearlized Doily, Pool Party sequins, Dimensionals, Rectangle Stitched Framelets

Calendar
Stamps, ribbon, and calendar page from December 2018 Paper Pumpkin kit
Paper: Grapefruit Grove, Pool Party
Ink: Grapefruit Grove, Pool Party
Other accessories: Pool Party sequins, Dimensionals

Fishes
Stamps from December 2018 Paper Pumpkin kit
Paper: Bermuda Bay, Pool Party, Whisper White
Ink: Mango Melody, Pool Party, Bermuda Bay
Other accessories: Pool Party sequins, Seaside Textured Impressions embossing folder, Frosted Epoxy Droplets, Gold Irresistible Pico Embellisher, Dimensionals


Can’t Tie a Straight Bow

Like many other stampers, I look to other paper-crafters for design inspiration. Oftentimes, I don’t completely copy the card. Sometimes, I don’t have all the same stamps, papers, embellishments, or proper tools. Other times I don’t copy the card because I can’t tie straight bow worth a damn. People have tried to show me, but it just doesn’t stick. This is the case with the two cards below.

20181126_212406362_iOS

I just love this little penguin and the Christmas sweater light bulbs from the Making Every Day Bright set. The card that inspired me to make this one had a lovely red bow on the front. I used sparkly white washi tape to give it some flare instead.

brightly lit

Here is another card inspired by a fellow stamper’s creation. I didn’t have most of the supplies for this one, so my card looks quite different from the original. Again, the card is bow-free.

Supplies:

Stamps: Making Christmas Bright, Making Every Day Bright

Paper: Gray Granite, Mellow Moss, Festive Farmhouse DSP, Joyous Noel Glimmer Paper, Very Vanilla

Other:

Christmas Bulb Builder Punch, Suite Season Specialty Washi Tape


Ruffling Feathers

Let’s get straight to it. Here’s my take on October’s Paper Pumpkin, Friends of a Feather. Knowing the color scheme ahead of time, I wasn’t jazzed about it. Cajun Craze, Coastal Cabana, Crumb Cake, Fresh Fig, Grapefruit Grove, and Night of Navy seemed like an odd combination of a long list of colors. It’s still unlikely that I would use all these colors on the same card, but I will say that Stampin’ Up delivered a very satisfying kit nonetheless. The colors are successfully combined, but not all at once. The kit included oodles of extra punched-out feathers and leaves in varying colors and sizes. I could pick and choose which colors I wanted on the card instead of using them all at once. I absolutely loved the feather theme.

If you assemble the kit according to the instructions, you’ll end up with the eight cards pictured below–four of one kind and four of the other.

10.18_PP_FACEBOOK

I’ve created two alternatives to share with you today. Except for 1/2 sheet of Crumb Cake cardstock to use as a card base, these cards are made exclusively with reengineered kit contents.

If you don’t mind deconstructing the envelopes, they can be used as an additional source of solid-color paper. My first card is a simple variation of the card with white feather cutouts layered in front of the Fresh Fig  background.  I removed the purple section of the card and replaced it with a section of the Grapefruit Grove envelope.

oct_2018_alternate_3

Here’s my card side by side with the original. I think it makes the card feel livelier.

oct_2018_alternate_2

If the envelopes happen to have a patterned lining, as these ones do, you can splay open the envelope and use it as decorative paper.

oct_2018_alternate_5

In addition to decorating the card front with the lining of the purple envelope, I used the rest of it to make a matt for the tag that resembles a squished octagon. Here’s how I did it.

First, I traced the tag onto the envelope.

Tag Instruction-1

I used a ruler to draw another line away from the original. I didn’t do any intricate measurements, I just lined up the hash marks on the ruler with the lines on the tag.

Tag Instruction-2

I repeated this step on all sides of the traced tag.

Tag Instruction-3

I cut along the outer lines.

Tag Instruction-4

I flipped the paper over to hide the pencil lines.

Tag Instruction-5

Finally, I matted the original tag on it, embellished it, and applied it to my card.

oct_2018_alternate_5

You may have noticed that I didn’t use the gold metallic baker’s twine very much. I am awful at tying bows, and this particular twine kept twisting up or unraveling, so I decided not to use it. I’m sure those of you with more dexterity than I have could further spruce up these cards using the twine. Overall, I’m pleased with this kit.